
UPDATE (1/24/2022):
Version 5.0 of Reaticulate is now officially released! This version introduces several major improvements, many of which are reflected in this guide. For a the full changelog, click here.
Please note that some of the screenshots and animations on this guide are from versions prior to 5.0 and thus might look different to what you see.
What is Reaticulate?
Reaticulate is a free script for REAPER that functions as a powerful, attractive, and easy-to-use articulation management system that dramatically speeds up workflow with complex sample libraries. Here's an example of said workflow:
Yes, it really is that easy. (Note: this is only one of many ways to use the script)
What is this guide for?
The following is one of two "quick start" guides I've written about Reaticulate. This particular guide will teach you how to get started creating your own articulation lists.
Reaticulate is still in the alpha stage of development which means there is no graphical interface for constructing your own articulation lists (although it's in the works!). Therefore - in order to use Reaticulate with your libraries - you’ll either have to build your own articulation lists by editing a text file, import other user's articulation lists, or a mix of both. This can be a bit intimidating at first, so I've tailored this guide to help you get started with the process as quickly and easily as possible.
After you've imported or set up your own articulation lists, take a look at this companion guide where I cover basic usage as well as tips and tricks to get the best out of the script. When you want to dig into the full details of what Reaticulate can do, the script’s author, Jason Tackaberry (AKA “Tack”), has created an excellent website for that very purpose. There, you will find comprehensive documentation on Reaticulate's features and capabilities.
How Reaticulate Works
Reaticulate alters an existing MIDI function – Program Changes – and turns them into shortcuts that output up to 16 different MIDI events when triggered. These MIDI events can be any combination of note-ons, CC values, channel specifications, and more. This allows you to condense even the most complex articulation-switching instructions a sample library might need into a single click, dramatically speeding up your workflow while also keeping your piano roll clutter-free.
Reaticulate stores these instructions in a text file called Reaticulate.reabank, located in your REAPER/Data folder. This is the text file you'll be editing to create your own banks. Prior to version 5.0, importing banks made by other users involved editing this text file as well, but now the process is quite straightforward. Both processes (importing and creation) are covered below:
NOTE: For all intents and purposes related to Reaticulate, the term “Bank” essentially means “Articulation List".
Importing User-Made Banks
Before you go about making your own banks, you might want to import banks made by other users to use as a reference or starting point for your own. Or, perhaps another user has made a bank for your particular sample library, which means you'll have little to no customization to do at all! There are two methods of doing so.
But first, click here to head to the Git-Hub based userbank repository to find and download user-contributed banks.
Method #1 - Import from Clipboard
- Select the raw text of the bank(s) you want to import (either directly from GitHub or from another user's text file that you've downloaded) and copy the text to the clipboard.
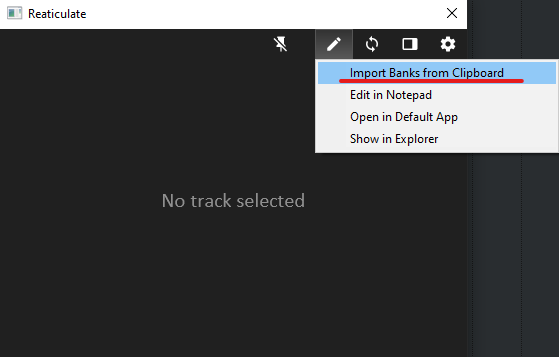
- Click on the pencil icon at the top of the Reaticulate window and select "Import Banks from Clipboard"
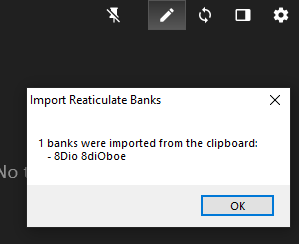
- Assuming the text you copied was the full bank, a dialog will pop up to inform you what banks have been imported, like so:


Method #2 - Import from File
- Select one or more Reaticulate.reabank files that you wish to import.
- Drag and drop them onto the Reaticulate window.
- That's it! Assuming the syntax of the imported files is correct, Reaticulate will import in just the same way as the above method.
NOTE: Using either method to import the banks will NOT overwrite any banks you have in your own Reaticulate.reabank file. Instead, the script will ADD them at the end of your personal file. Furthermore, imported banks will not conflict with any of your existing banks. As of 5.0, Reaticulate takes care of all these compatibility concerns for you automatically.
Creating your Own Banks
First, we'll need to access the Reaticulate.reabank text file. The easiest way to access this file is from the Reaticulate window itself, pictured below:

You can edit this file with a simple text editor, but I highly recommend using a more robust program like Notepad++ or Sublime Text in order to read the text much more easily. The example screenshots that follow are taken from my configuration of Notepad++.
Step One – Understanding our Sample Libraries
Before we begin creating a bank, we need to know what we’re creating it for. For demonstration purposes, I’ve configured a Solo Violin sample library that uses keyswitches to change articulations:

Every sample library has their own way of handling articulation changes, so you’ll need to figure out how your library (or libraries) work in this regard in order to be able to tell Reaticulate what it needs to do.
In this example, we’ll need Reaticulate to be able to trigger C2 through A2, as seen above.
Step Two – Creating the Bank
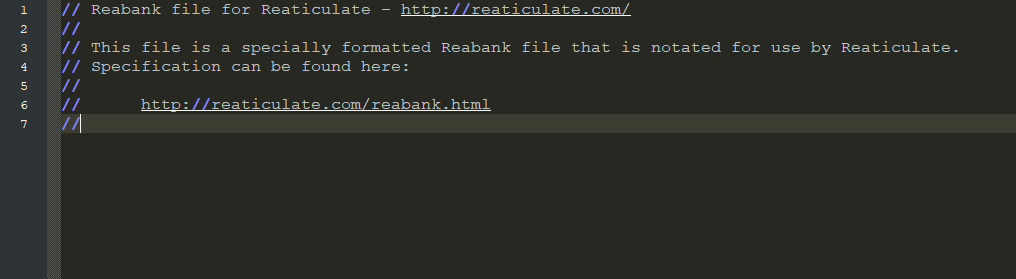
If you just installed Reaticulate, your Reaticulate.reabank file will look like this:
To create the bank that we'll use to control the Violin library above, we'll type the following:
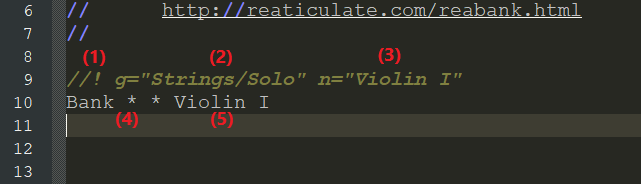
- The //! before the rest of the code is a required piece of syntax before certain lines. Don't worry about the specifics: all you need to do is follow the examples I give and place it where I do.
- g stands for group, and whatever is written in quotes here is the folder path that you will navigate through to load the bank into Reaticulate. More on how this text translates into the GUI below.
- n stands for name, and whatever is written in quotes here is what the bank's name will be in the folder tree.
- As of version 5.0, there is no longer a need to type specific numbers after the word "Bank". Instead, just type two asterisks as pictured above. If you really want, you can type two numbers in place of the asterisks, but the outcome will be the same: Reaticulate assigns the bank a unique ID and takes care of bank-to-bank compatibility behind the scenes. You may notice that after loading the file into Reaticulate and then returning to the text file, this unique ID will magically appear. It will look something like this:
 Simply leave that line of text alone and the script will take care of the rest. (Note that you do NOT need to alter this in any way for any other user to be able to successfully import your bank, not do you need to delete it from or alter it in banks that you import.)
 - This is the name that will appear at the top of the articulation list in the Reaticulate window.
 Simply leave that line of text alone and the script will take care of the rest. (Note that you do NOT need to alter this in any way for any other user to be able to successfully import your bank, not do you need to delete it from or alter it in banks that you import.)
Be sure to save your changes to the Reaticulate.reabank file. Time to load it up in Reaticulate!
IMPORTANT: Every time you make changes to the Reaticulate.reabank file, you must remember to click the "Refresh" icon in the Reaticulate GUI, as pictured here:

If you don't do this, Reaticulate will not update to reflect the changes you've made to the text file.
To load the bank, do the following:
As you can see, the folder structure we specified shows up, and we get the bank. There's only one problem: there aren't any articulations! Let's fix that.
Step Three - Creating the Articulations
The first articulation in this Violin library is a legato articulation, which is triggered by pressing C2. So, we write this:
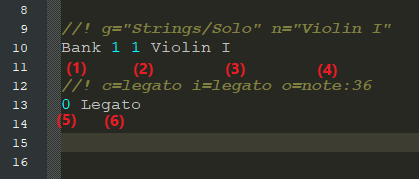
- Again, the //! is required here. No need to worry about specifics; just follow this template.
- c stands for color. What you write here after the = will determine the color of the articulation's icon. Reaticulate comes with preset colors that correspond to different names; in this particular case, "legato" is a green shade. As of version 5.0, you can easily access the preset colors and change them to your liking via the Preferences tab (accessed by clicking the cog icon at the top right of the Reaticulate window). You can also enter hex codes in this field if you want a custom color that doesn't correspond to a preset name. This is not a required field, although it's highly recommended for easy visual navigation of your banks.
- i stands for icon. What you write here after the = will determine what icon is used to represent the articulation. Reaticulate comes with preset icons that correspond to different names; in this case, "legato" is a picture of two notes connected by a slur. This is a required field, but don't worry; if you type an invalid name here, the icon will just default to a picture of an eighth note. Click here to view the list of preset icons
- o stands for output. This is where you specify exactly what happens when the articulation is triggered. There are a lot of possible commands to enter here but in this case the only one necessary is a note output, so we type note:[insert note number here]. Why 36? Because 36 is the MIDI specification for note C2, which is the note we need to trigger the articulation. Click here for a very handy chart of MIDI note specifications
- This number tells Reaticulate which articulation this is. Each bank can have up to 128 articulations assigned to it (by typing any number between 0-127). These can be entirely out of order if you want; the only requirement is that each articulation needs to have its own number.
- This is the name of the articulation that will appear in both the Reaticulate window and in the Bank/Program Change CC Lane of REAPER's MIDI Editor when the articulation is actually applied to the MIDI editor.
NOTE: Regarding #5 above...when assigning numbers to articulations, it's advisable to think ahead and match these numbers across different banks in certain situations. For example, let's say you have a library for various string instruments, brass instruments, and woodwind instruments. When sketching things out in REAPER, you may compose a melody line complete with various articulation changes, but have no idea which instrument family to assign it to yet. If your banks all have the same number assigned to a certain articulation - i.e. staccato is always number 32 - then you will be more easily able to swap different libraries in and out of the track to see which one suits the melody best. This is because each library's bank will use the program number of 32 to trigger the staccato articulation - no need to go through the piano roll and redo all the articulation assignments. This is also very handy in conjunction with a new feature introduced in 5.0 that allows you to batch assign articulations to multiple selected tracks in one click: see the companion guide for more information.
And that's an articulation! So we save the Reaticulate.reabank file, remember to click the "Refresh" icon, and then see what's added:
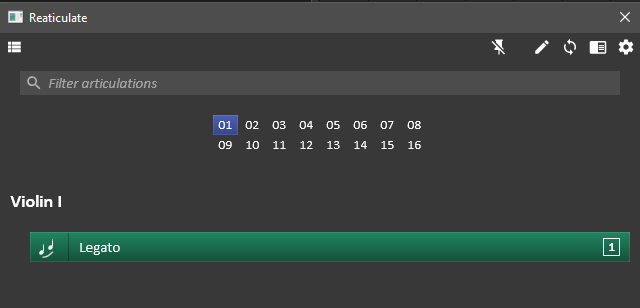 And there it is! Nine more to go. Finishing the bank up, we type the following...
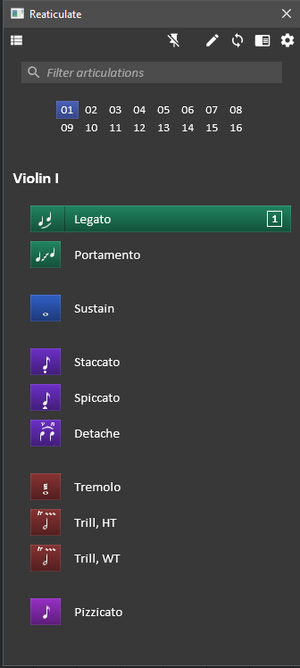
 Once we save and refresh, we get this...
 Now let's check to make sure it's actually doing what it's supposed to do. By left-clicking the articulations, we trigger the output events (what came after the o= in the text file). By doing this side by side with the sample player window, we can see if our articulations are matching up.
Note: Left clicking will not insert the articulation into the Bank/Program Change CC Lane in the MIDI Editor. To do that, you will need to double click or right click. I explain this usage in further detail in this post.
So, let's check:
It works! The bank is now ready to use for MIDI recording or programming. However, let's do a few extra (and optional) things just to polish it up a bit:

- Any text that comes after a // (Note: there is no exclamation mark) is treated as a comment, not code. You can type whatever you want here. In this case, I've used it to visually organize the text file so it's easier to parse what's going on. Organize the text file in a way that best suits you.
- //! spacer=[insert number here] is a way to put space between articulations, improving the visual aspect of the list. A value of 1 here will usually be sufficient.
Here's what the changes add:
And that's it! This was a simple example, of course, and there are plenty of sample libraries that use quite a bit more than just a few keyswitches to handle their articulations. Not to worry: Reaticulate can handle extremely complex combinations of outputs. It's possible to configure condition-dependent articulation triggering (i.e. "playing modes"), combine multiple types of outputs (i.e. a CC value along with a note-hold at a certain velocity), layer articulations, and a whole lot more that's beyond the scope of this guide.
To dig into all that good stuff, click here. Or, if you want to get started using the script right away, head on over to my companion guide for basic usage.
I hope this has helped you get a handle on this fantastic script. Depending on how many libraries and articulations you have at your disposal, this can take a bit of time to set up, but I promise you that the time you'll save in the long run is well, well worth it.
- Sam